
There is a particular kind of problem that only shows up on a PQC site at the worst possible moment. The concrete is on its way, the paver is ready, and someone realises a roll of separation membrane is short or the groove-cutting blades for the slab were never ordered. The pour does not wait, and neither does the schedule.
PQC road construction is a sequenced operation. Each stage hands over to the next, and each stage depends on the right accessories being on site, in the right quantity, at the right time. A missing item is not a small inconvenience. It can stall a pour or cost a sawing window.
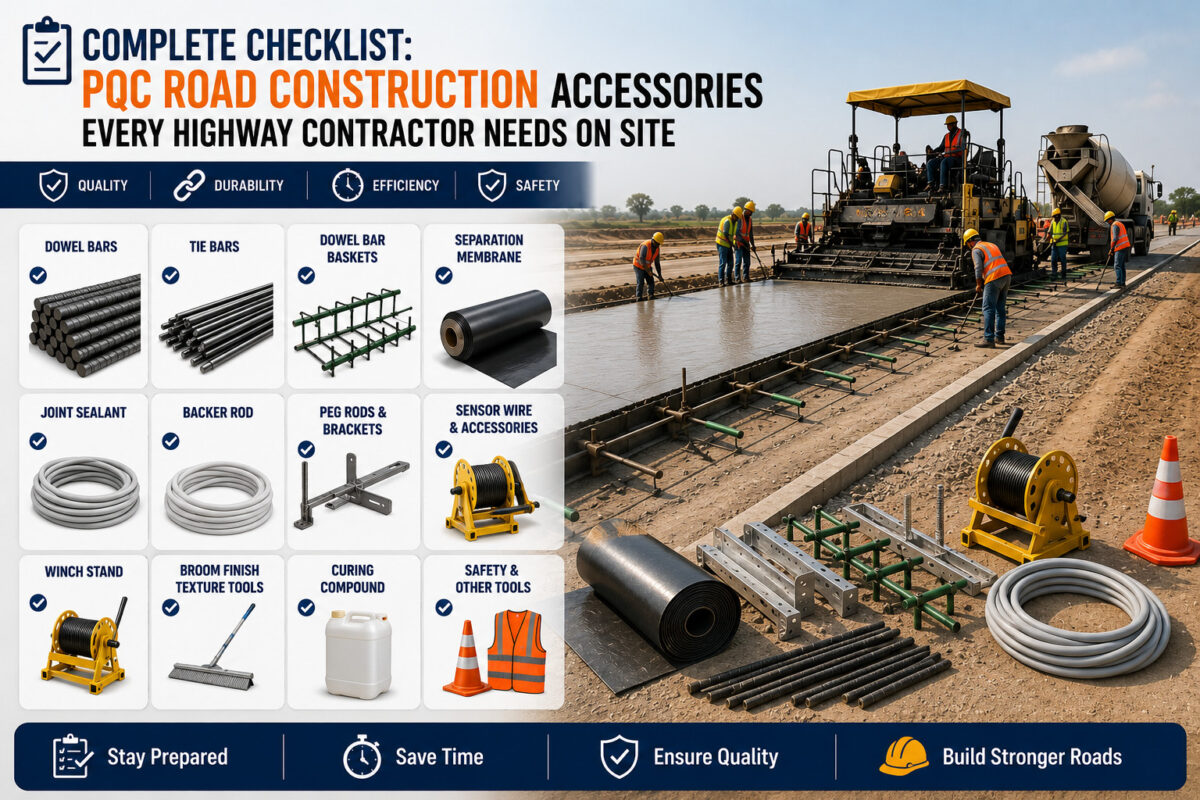
This article is a complete, practical checklist of the PQC road construction accessories a highway contractor needs on-site. It is organized by construction stage, so it can be used as a real planning tool rather than just a list.
What Counts as a PQC Accessory?
A PQC accessory is any item, other than the bulk concrete and steel, that the construction of a concrete pavement depends on. Some accessories become a permanent part of the pavement, such as the separation membrane and the expansion joint board. Others are tools and consumables used to build and finish the slab, such as the texturing brush and the groove cutting blade.
Both kinds matter equally. The permanent accessories decide how the pavement behaves and lasts. The tools and consumables decide whether the work can be done at all. A good checklist treats them together, because on site they are needed together.
The sections below walk through the accessories stage by stage, in the order the work actually happens.
Stage 1: Base Preparation and Grade Control
Before any concrete is placed, the base has to be ready and the paver has to have an accurate reference to follow.
• Peg rods: The firm stakes that support the string line along the paving lane.
• Sensor wire: The reference line that the paver senses for line and level.
• Winch stand: Tension the string line so it pulls straight and does not sag.
• Separation membrane: The impermeable LDPE sheet was laid over the dry lean concrete base, just ahead of the paver.
Grade control is set with the peg rods, sensor wire, and winch stand working together, and the separation membrane is the last thing down before the slab. Get this stage complete and accurate, and the pour starts on a sound footing.
Stage 2: Joints and Reinforcement Accessories
The joint and reinforcement items have to be set in place before concreting, because the concrete is poured around them.
• Dowel bar sleeves and caps: Fitted to the dowels at transverse joints, allowing the joint to move and expansion joints to expand.
• Expansion joint board: The compressible filler placed at expansion joints to take up slab movement.
These accessories are part of the joint system that controls how the pavement moves and cracks. They must be the correct size for the bars and the joints, and they must be set accurately, since their position is locked in the moment the concrete arrives.
Stage 3: Concrete Placement and Finishing Accessories
Once concreting starts, the focus shifts to compaction and surface finish.
• Needle vibrator. Compacts the concrete within the mass, removing trapped air and voids.
• Screed vibrator. Works and levels the surface during placement.
• Concrete floater. Used for hand finishing to close and smooth the surface.
• Power trowel. Produces a dense, smooth finish where the work requires it.
• Texturing brush. Draws the final skid-resistant texture across the fresh slab.
Compaction and finishing decide the density, strength, and surface quality of the slab. The texturing brush in particular has a safety role, since the surface texture provides the skid resistance the finished road needs.
Stage 4: Joint Cutting and Sealing Accessories
After the slab has gained enough strength, the joints are cut and then sealed.
• Groove cutting machine: The saw that cuts the connections and other joints.
• Groove-cutting blade: The diamond blade is selected to match the aggregate and the required depth.
• Sealant and primer: Seal the cut joints and prepare the joint faces so the sealant bonds.
• Backer rod: Placed in the joint groove to back the sealant correctly.
• Crack repair materials: Used to treat any random cracks that appear in the slab.
This stage protects the long life of the pavement. Joints that are cut on time and sealed well keep water and debris out, and prompt crack treatment stops small problems from growing.
Stage 5: Supporting Accessories and Equipment
A few more items support the work across several stages.
• DWC pipe: Double-wall corrugated pipe used where cross drainage or duct provision is required.
• PPE fibre and glass fibre: used in the pipe and concrete to improve crack resistance where the design specifies them.
• Bandsaw machine: Used to cut dowel and tie bar steel accurately to length.
• Curing materials: Curing compound and hessian or other approved covering to cure the slab.
These items do not all belong to a single stage, but each one has a clear role, and leaving any of them off the schedule creates a gap.
The Complete PQC Accessories Checklist
The table below brings the whole list together as a single reference. It can be copied into a project planning sheet and checked off before paving begins.
| Stage | Accessory | Purpose |
| Base and grade control | Peg rods | Support the string line |
| Base and grade control | Sensor wire | Reference line for the paver |
| Base and grade control | Winch stand | Tension the string line |
| Base and grade control | Separation membrane | Debonding layer over the DLC |
| Joints and reinforcement | Dowel bar sleeves and caps | Allow joint movement and expansion |
| Joints and reinforcement | Expansion joint board | Compressible filler at expansion joints |
| Placement and finishing | Needle vibrator | Compact the concrete mass |
| Placement and finishing | Screed vibrator | Work and level the surface |
| Placement and finishing | Concrete floater | Hand finish the surface |
| Placement and finishing | Power trowel | Produce a dense, smooth finish |
| Placement and finishing | Texturing brush | Create skid resistant texture |
| Joint cutting and sealing | Groove cutting machine | Cut the joints |
| Joint cutting and sealing | Groove cutting blade | Diamond blade matched to the slab |
| Joint cutting and sealing | Sealant and primer | Seal and prepare the joints |
| Joint cutting and sealing | Backer rod | Back the joint sealant |
| Joint cutting and sealing | Crack repair materials | Treat random cracks |
| Supporting items | DWC pipe | Cross drainage or duct provision |
| Supporting items | PPE fibre and glass fibre | Improve crack resistance where specified |
| Supporting items | Bandsaw machine | Cut dowel and tie bar steel |
| Supporting items | Curing materials | Cure the finished slab |
How to Use This Checklist
1. Start from the project design: Read the drawings and specifications and confirm which accessories the project actually requires and to what specification.
2. Set quantities against the program: Tie quantities to the length of pavement and the paving schedule, not to rough estimates.
3. Confirm specifications: Make sure each item is specified correctly, for example, virgin LDPE membrane at the right thickness and dowel sleeves to the right bar size.
4. Plan lead times: Order each item early enough that it arrives before it is needed, not during the pour.
5. Stage and store on site: Receive, check, and store everything properly so it is protected and ready.
6. Keep critical spares: Hold spares of the items most likely to run short, such as membrane rolls and cutting blades.
7. Check off before each pour. Run through the checklist before every paving operation as a formal hold point.
Common Mistakes to Avoid
• Treating accessories as an afterthought: They are part of the construction, not a side purchase.
• Ordering late: Lead times are real, and a fast tracked job will not wait.
• Vague specifications: Generic items can fail to meet the project requirement.
• Underestimating quantities: A short order stops the pour.
• No spares: A single blade or membrane shortage can cost a pour or a sawing window.
• Poor storage: Membrane left in the sun or steel left to rust fails before use.
• Skipping the pre-pour check: Without a final checklist run, gaps go unnoticed until it is too late.
Best Practices for Accessory Planning
• Build the accessory checklist from the project design at the very start of the job.
• Specify every item correctly and to the project specification.
• Tie quantities to the paving programme and review them against progress.
• Order with realistic lead times and confirm delivery dates.
• Inspect every delivery against the specification before acceptance.
• Store all accessories properly and keep critical spares on site.
• Run the checklist as a hold point before every pour.
• Treat the accessory supply chain as a core part of project planning.
Conclusion
A PQC road is built in a strict sequence, and that sequence only runs smoothly when every accessory is on site and ready at the moment it is needed. The separation membrane, the dowel sleeves, the peg rods and sensor wire, the vibrators and floaters, the cutting blades and sealants, each one has a job and a place in the order of work.
The contractors who never get caught short are the ones who treat the accessory checklist as a planning tool, not a formality. They build the list from the design, specify every item correctly, tie quantities to the programme, order early, store well, and keep spares. Use the checklist in this article as a starting point, adapt it to the specific project, and run it before every pour. Do that, and the accessories will never be the reason a concrete road falls behind.
Frequently Asked Questions
What are PQC road construction accessories?
PQC road construction accessories are the items, other than the bulk concrete and steel, that a concrete pavement depends on. They include permanent items such as the separation membrane and expansion joint board and tools and consumables such as the texturing brush and groove cutting blade.
What accessories are needed for PQC road construction?
Key accessories include peg rods, sensor wire, a winch stand, separation membrane, dowel bar sleeves and caps, expansion joint board, needle and screed vibrators, a concrete floater, power trowel, texturing brush, groove cutting machine and blades, sealant, primer, backer rod, and crack repair materials.
Why is an accessory checklist important on a PQC site?
PQC construction is a sequenced operation where each stage depends on the right accessories being ready. A checklist makes sure nothing is missed, since a single missing item can stall a pour or cost a sawing window.
Which accessories are used for grade control?
Grade control uses peg rods to support the string line, sensor wire as the reference line the paver follows, and a winch stand to tension the line so it does not sag.
Which accessories are used for joint cutting and sealing?
Joint cutting and sealing use a groove cutting machine and diamond groove cutting blades to cut the joints, and sealant, primer, and backer rod to seal them, along with crack repair materials for any random cracks.
When should PQC accessories be ordered?
PQC accessories should be ordered early in the project, with realistic lead times, so that every item arrives and is staged on site before paving begins. Ordering during the pour is too late.
Do PQC accessories need to be specified, or can generic items be used?
PQC accessories must be specified correctly according to the project requirements. Generic items can fail to meet the specification; for example, a separation membrane must be virgin LDPE at the correct thickness, not a generic polyethene sheet.
What happens if an accessory runs short during a pour?
If an accessory runs short during a pour, the operation can stall at the worst moment. This is why critical spares, such as membrane rolls and cutting blades, should always be kept on site.
Related Blogs

Bharatmala Phase 2 in 2026: What PQC Accessories and Materials Are Required for NHAI Projects
PQC Road Construction Step by Step: Materials, Equipment, and Accessories Required
IRC:15 Standards for Concrete Road Construction: What Contractors Must Comply With in 2026